
GM 700-R4 and 200-4R Transmission Installation Instructions
PLEASE FEEL FREE TO CALL US ON OUR TECH LINE AT (330) 434-2757 BETWEEN 8:00 AM AND 5:00 PM EST IF YOU HAVE ANY QUESTIONS.
Failure to read and follow these instructions carefully could result in your warranty being void.
Please read instructions completely before installing your transmission. Also, we have provided a check list of necessary items to help you along with your installation.
Lock-Up Wiring:
Need a 12-volt wire that’s hot with key on
Transmission torque converter will lock-up in 4th gear only.
Vacuum switch will deny lock-up under wide open throttle, heavy acceleration, and while ascending steep grades.
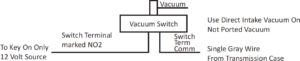
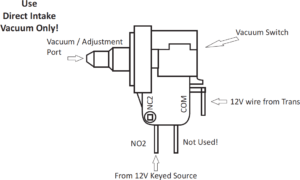
Vacuum Switch Installation:
Tee off of manifold vacuum to the supplied switch.
The adjustment screw for the trigger point of the switch is located in the center of the hose nipple.
The switch is adjustable from 6” to 22” of vacuum. Turning the screw clockwise will make the trigger point happen sooner as the vacuum drops. (Roughly 6” at max turns in.) Turning the screw counterclockwise will push the trigger point back until a lower vacuum is achieved. (Roughly 1” at max turns out.) If your vehicle surges in and out of lock-up, please turn the vacuum switch adjustment screw 2 turns counterclockwise.
The supplied vacuum switch is pre-adjusted at 12” to 15”.
Transmission Cooler:
External stand alone transmission cooler supplied must be installed or your warranty will be voided.
DO NOT use transmission cooler in conjunction with radiator cooler.
Cooler must be installed in front of the radiator.
Constant, forward air flow is a MUST! If not possible, then you need a cooler with an integrated fan and proper air flow. Either way the cooler is essential to the transmission.
NEVER install the cooler under the floor pan of the vehicle. The best possible place to position the cooler is in front of the air conditioning condenser.
Only use hose supplied with cooler. If more hose is required, use only hose rated for automatic transmissions. DO NOT use rubber fuel line, EVER!
Use only Gearstar’s 6 A/N cooler line fittings. Gearstar’s 6 A/N cooler fittings are straight 1/4” pipe threads.
Using 1/4” tapered pipe thread fittings could crack your transmission case and will void the warranty.
PLEASE READ THIS FIRST
DO NOT REMOVE TORQUE CONVERTER BRACKET UNTIL YOU ARE READY TO INSTALL THE TRANSMISSION.
THE TRANSMISSION AND TORQUE CONVERTER ARE TO BE INSTALLED AS ONE UNIT.
UNDER NO CIRCUMSTANCES SHOULD THE TORQUE CONVERTER BE REMOVED FROM THE TRANSMISSION.
Torque Converter and Transmission Installation:
Make sure dowel pins are clean and free of rust and installed in engine.
Clean crank shaft pilot of any rust or debris and smear light coating of grease in crank shaft pilot. DO NOT use NeverSeize.
Lightly grease fill tube and T.V. cable boots and insert into the transmission.
Lightly grease fill tube and T.V. cable ends, with light pressure push them into transmission case. (If using Lokar components lightly silicon o-rings and install. When using Lokar components filler tube and T.V. cable boots are not used.)
With transmission installed in vehicle, converter should not be touching the flexplate.
Torque converter clearance to fly wheel should be 1/8” to 3/16”. If clearance is greater than 3/16” use 3 machine washers of equal thickness to achieve proper clearance.
Pull converter to flexplate to engage pilot.
Use medium strength thread locker on converter bolts, start converter bolts and torque to factory specs of 35 ft-lbs.
Re-torque transmission pan bolts to 10 ft-lbs.
CAUTION: TRANSMISSION PAN HAS BEEN DRAINED OF FLUID BEFORE SHIPMENT. PAN MAY REFILL OVER TIME DUE TO CONVERTER DRAIN BACK. THIS WILL SIMULATE A OVERFULL CONDITION IN THE TRANSMISSION. THE ATF LEVEL WILL GO DOWN AFTER INITIAL STARTUP. THE ADDITIONAL OIL PROVIDED IS STILL NECESSARY TO FILL TRANSMISSION PROPERLY.
IMPORTANT!!!! IF YOU ARE INSTALLING A 200-4R LEVEL 3 OR 4 (FOR DRAG RACING), OVER FILL TRANSMISSION PAN BY 1 ½ QUARTS.
Fluid:
Use a good, high quality automatic transmission fluid, such as Castrol Dexron VI.
Please do not use any purple ATF, such as B&M Trick Shift, this will void your warranty.
Check fluid level while idling in park on a level surface. DO NOT overfill, this may cause oil to leak out of the transmission breather tube.
Check transmission for any leaks around the transmission lines at the cooler and on the transmission itself.
T.V. Cable:
Geometry Kit MUST be installed before T.V. Cable is adjusted.
T.V. Cable boot must be inserted into transmission case, not on cable housing, otherwise breakage will occur.
T.V. Cable must be connected to carburetor or fuel injection unit.
T.V. Cable controls pressure rise in transmission in relationship to amount of throttle being given.
Proper adjustment of cable is critical for transmission to operate and function properly.
Adjustments:
With vehicle not running and in park, insert black teardrop shaped clip on cable end and connect to throttle lever.
Next, slide the brass barrel onto cable, do not tighten barrel at this time.
Using small vice grips, fully extend transmission throttle cable to maximum adjustment.
Slide brass barrel against throttle clip with vehicle at wide open throttle and tighten.
Vehicle can be road tested at this time. (This is only an initial adjustment.)
Road Test:
If transmission is shifting light, tighten throttle pressure cable 1/8” at a time until shift points are within specs. If transmission is shifting late and hard, loosen throttle pressure cable 1/8” at a times until shift points are within specs.
Shift points may vary due to differential gear ratios and speedometer calibrations. Shift points should be as follows:
- 1st to 2nd gear up shifts at light to medium throttle should be between 21-26 mph.
- 2nd to 3rd gear up shifts at light to medium throttle should be between 32-40 mph.
- 3rd to 4th gear up shifts at light to medium throttle should be between 45-50 mph.
While on road test, stop vehicle and place shifter in low 2 position; continue road test in low 2 position.
Allow vehicle to shift into 2nd gear.
After 2nd gear up shift has been achieved push gas pedal to wide open throttle transmission should downshift back to 1st gear.
If this happens throttle pressure adjustment is within specs, if not, throttle pressure cable needs to be tightened using 1/8” increments (make sure floor mat is not pushed up under gas pedal).
Check the transmission fluid level again.


